还是那堆联通云机,交付前 LVM 也不给搞好,云盘默认也不挂载,特别吐槽一下。怀念某云的傻瓜式服务,前者到底是国有,揍是硬气。

这是扩容前的情况:

[root@centos7 ~]# df -h
Filesystem                 Size  Used Avail Use% Mounted on
/dev/mapper/rootvg-rootlv   10G   10G   20K 100% /
devtmpfs                   3.9G     0  3.9G   0% /dev
tmpfs                      3.9G     0  3.9G   0% /dev/shm
tmpfs                      3.9G  369M  3.5G  10% /run
tmpfs                      3.9G     0  3.9G   0% /sys/fs/cgroup
/dev/vda1                  485M  166M  319M  35% /boot
tmpfs                      783M     0  783M   0% /run/user/0

用 vgs 和 lvs 看一下可用空间,并根据实际情况构造如下命令:

[root@centos7 ~]# lvresize -L +37.51G /dev/rootvg/rootlv
  Rounding size to boundary between physical extents: 37.51 GiB.
  Size of logical volume rootvg/rootlv changed from 10.00 GiB (2560 extents) to 47.51 GiB (12163 extents).
  Logical volume rootvg/rootlv successfully resized.

最后同步一下文件系统就搞定了:

[root@centos7 ~]# xfs_growfs /dev/rootvg/rootlv
meta-data=/dev/mapper/rootvg-rootlv isize=512    agcount=4, agsize=655360 blks
         =                       sectsz=512   attr=2, projid32bit=1
         =                       crc=1        finobt=0 spinodes=0
data     =                       bsize=4096   blocks=2621440, imaxpct=25
         =                       sunit=0      swidth=0 blks
naming   =version 2              bsize=4096   ascii-ci=0 ftype=1
log      =internal               bsize=4096   blocks=2560, version=2
         =                       sectsz=512   sunit=0 blks, lazy-count=1
realtime =none                   extsz=4096   blocks=0, rtextents=0
data blocks changed from 2621440 to 12454912

验证:

[root@centos7 ~]# df -h
Filesystem                 Size  Used Avail Use% Mounted on
/dev/mapper/rootvg-rootlv   48G  9.8G   38G  21% /
devtmpfs                   3.9G     0  3.9G   0% /dev
tmpfs                      3.9G     0  3.9G   0% /dev/shm
tmpfs                      3.9G  369M  3.5G  10% /run
tmpfs                      3.9G     0  3.9G   0% /sys/fs/cgroup
/dev/vda1                  485M  166M  319M  35% /boot
tmpfs                      783M     0  783M   0% /run/user/0

自己马克一下。

最近接手了一堆联通 IDC 的云主机(数量真的很多),也分配了云盘资源。看了一下需要手动挂载,对于懒癌重度患者亟须解放劳动力。

以下是笔记。

首先确认云盘资源是否已分配关联:

[root@centos7 ~]# fdisk -l

结果:

磁盘 /dev/vda:53.7 GB, 53687091200 字节,104857600 个扇区
Units = 扇区 of 1 * 512 = 512 bytes
扇区大小(逻辑/物理):512 字节 / 512 字节
I/O 大小(最小/最佳):512 字节 / 512 字节
磁盘标签类型:dos
磁盘标识符:0x000d3443

   设备 Boot      Start         End      Blocks   Id  System
/dev/vda1   *        2048     1001471      499712   83  Linux
/dev/vda2         1001472   104857599    51928064   8e  Linux LVM

磁盘 /dev/vdb:429.5 GB, 429496729600 字节,838860800 个扇区
Units = 扇区 of 1 * 512 = 512 bytes
扇区大小(逻辑/物理):512 字节 / 512 字节
I/O 大小(最小/最佳):512 字节 / 512 字节

磁盘 /dev/mapper/rootvg-rootlv:10.7 GB, 10737418240 字节,20971520 个扇区
Units = 扇区 of 1 * 512 = 512 bytes
扇区大小(逻辑/物理):512 字节 / 512 字节
I/O 大小(最小/最佳):512 字节 / 512 字节

磁盘 /dev/mapper/rootvg-swaplv:2147 MB, 2147483648 字节,4194304 个扇区
Units = 扇区 of 1 * 512 = 512 bytes
扇区大小(逻辑/物理):512 字节 / 512 字节
I/O 大小(最小/最佳):512 字节 / 512 字节

因此确定云盘设备路径为:

/dev/vdb

初始化:

[root@centos7 ~]# fdisk /dev/vdb

可按需进行分区,我这边只设置一个主分区。

接着以 ext4 格式对其进行格式化:

[root@centos7 ~]# mkfs.ext4 /dev/vdb

其结果:

mke2fs 1.42.9 (28-Dec-2013)
文件系统标签=
OS type: Linux
块大小=4096 (log=2)
分块大小=4096 (log=2)
Stride=0 blocks, Stripe width=0 blocks
26214400 inodes, 104857600 blocks
5242880 blocks (5.00%) reserved for the super user
第一个数据块=0
Maximum filesystem blocks=2252341248
3200 block groups
32768 blocks per group, 32768 fragments per group
8192 inodes per group
Superblock backups stored on blocks: 
        32768, 98304, 163840, 229376, 294912, 819200, 884736, 1605632, 2654208, 
        4096000, 7962624, 11239424, 20480000, 23887872, 71663616, 78675968, 
        102400000

Allocating group tables: 完成                            
正在写入inode表: 完成                            
Creating journal (32768 blocks): 完成
Writing superblocks and filesystem accounting information: 完成

下一步对其进行手动挂载:

[root@centos7 ~]# mkdir /data
[root@centos7 ~]# mount /dev/vdb /data

行了,看看是否挂载正确:

[root@centos7 ~]# df -h

没问题的话,最后配置自动挂载:

[root@centos7 ~]# vim /etc/fstab

在文件最后添加一行:

/dev/vdb /data ext4 defaults 0 0

连在一起就是:

#!/bin/bash
fdisk /dev/vdb <<EOF
n
p
1


wq
EOF

mkfs.ext4 /dev/vdb &&  mkdir /data && mount /dev/vdb /data
echo '/dev/vdb /data ext4 defaults 0 0' >> /etc/fstab

然后用 pssh 之类的,哗啦一下都搞定。

- EOF -

这是在一个 BT 的运行环境下诞生的需求,折腾数日,写下来自己马克一下。

1、需求:

1.1、表单上传本地图片;
1.2、以指定最大宽或指定最大高处理缩略图;
1.3、以指定最大宽高缩放原图并添加图片水印;
1.4、缩略图及水印图须连同原图一同入库存储。

2、函数部分:

2.1、获取图片信息函数

function get_image_info($file) {
    $result = getimagesize($file);
    $info = array();
    $info['width'] = $result[0];
    $info['height'] = $result[1];
    $info['type'] = $result[2];
    return $info;
}

2.2、原图宽高与缩放宽高运算函数

function fix_image_size($source_width, $source_height, $max_width, $max_height) {
    $size = array();
    if ($max_width == false) {
        if ($max_height < $source_height) {
            $size['width'] = $max_width < $source_width ? floor($max_height / ($source_height / $source_width)) : $source_width;
            $size['height'] = $max_height;
        }
        else {
            $size['width'] = $source_width;
            $size['height'] = $source_height;
        }
    }
    elseif ($max_height == false) {
        if ($max_width < $source_width) {
            $size['width'] = $max_width;
            $size['height'] = $max_height < $source_height ? floor($max_width / ($source_width / $source_height)) : $source_height;
        }
        else {
            $size['width'] = $source_width;
            $size['height'] = $source_height;
        }
    }
    else {
        if (($max_width && $source_width > $max_width) || ($max_height && $source_height > $max_height)) {
            if ($max_width && $source_width > $max_width) {
                $width_ratio = $max_width / $source_width;
                $resize_width_tag = true;
            }
            if ($max_height && $source_height > $max_height) {
                $height_ratio = $max_height / $source_height;
                $resize_height_tag = true;
            }
            if ($resize_width_tag && $resize_height_tag) $ratio = $width_ratio < $height_ratio ? $width_ratio : $height_ratio;
            if ($resize_width_tag && !$resize_height_tag) $ratio = $width_ratio;
            if ($resize_height_tag && !$resize_width_tag) $ratio = $height_ratio;
            $size['width'] = floor($source_width * $ratio);
            $size['height'] = floor($source_height * $ratio);
        }
        else {
            $size['width'] = $source_width;
            $size['height'] = $source_height;
        }
    }
    return $size;
}

2.3、缩略图处理函数

function resize_image($source_image_string, $source_width, $source_height, $resize_width, $resize_height) {
    if (!empty($source_image_string) && !empty($source_width) && !empty($source_height) && (!empty($resize_width) || !empty($resize_height))) {
        $resize_image = imagecreatetruecolor($resize_width, $resize_height);
        $source_image = imagecreatefromstring(base64_decode($source_image_string));
        if (function_exists('imagecopyresampled')) imagecopyresampled($resize_image, $source_image, 0, 0, 0, 0, $resize_width, $resize_height, $source_width, $source_height);
        else imagecopyresized($resize_image, $source_image, 0, 0, 0, 0, $resize_width, $resize_height, $source_width, $source_height);
        $image_stream = array();
        ob_start();
        imagejpeg($resize_image, null, 100);
        $image_stream['data'] = ob_get_contents();
        $image_stream['length'] = ob_get_length();
        ob_end_clean();
        if (!empty($image_stream['data']) && $image_stream['length'] > 0) {
            imagedestroy($source_image);
            imagedestroy($resize_image);
            return $image_stream;
        }
        else return false;
    }
    else return false;
}

2.4、图片水印处理函数

function watermark_image($source_image_string, $source_width, $source_height, $watermark_image_file) {
    if (!empty($source_image_string) && !empty($source_width) && !empty($source_height) && !empty($watermark_image_file)) {
        $source_image = imagecreatefromstring(base64_decode($source_image_string));
        $watermark_image_info = get_image_info($watermark_image_file);
        if ($watermark_image_info['type'] == 1) $watermark_image = imagecreatefromgif($watermark_image_file);
        elseif ($watermark_image_info['type'] == 2) $watermark_image = imagecreatefromjpeg($watermark_image_file);
        elseif ($watermark_image_info['type'] == 3) $watermark_image = imagecreateFrompng($watermark_image_file);
        else return false;
        if (empty($watermark_image)) return false;
        $x = $source_width - $watermark_image_info['width'];
        $y = $source_height - $watermark_image_info['height'];
        imagecopy($source_image, $watermark_image, $x, $y, 0, 0, $watermark_image_info['width'], $watermark_image_info['height']) or die('Error');
        ob_start();
        imagejpeg($source_image, null, 100);
        $image_stream['data'] = ob_get_contents();
        $image_stream['length'] = ob_get_length();
        ob_end_clean();
        if (!empty($image_stream['data']) && $image_stream['length'] > 0) {
            imagedestroy($source_image);
            imagedestroy($watermark_image);
            return $image_stream;
        }
        else return false;
    }
    return false;
}

3、调用部分

3.1、表单数据获取

$attach_type = $_FILES['attach']['type'];
$attach_tmp_name = $_FILES['attach']['tmp_name'];
$attach_error = $_FILES['attach']['error'];
$attach_size = $_FILES['attach']['size'];

3.2、元数据处理

$source_image_file = $attach_tmp_name;
$source_image_info = get_image_info($source_image_file);
$source_image_string = base64_encode(file_get_contents($source_image_file));

3.3、入库原图处理

$fp_original_image = fopen($attach_tmp_name, 'rb');
if (!$fp_original_image) die('Error');
$original_image_content = addslashes(fread($fp_original_image, filesize($attach_tmp_name)));
fclose($fp_original_image);
unlink($attach_tmp_name);

3.4、缩略图处理

$thumbnail_image_width = 300;
$thumbnail_image_height = false;
$thumbnail_image_size = fix_image_size($source_image_info['width'], $source_image_info['height'], $thumbnail_image_width, $thumbnail_image_height);
$thumbnail_image = resize_image($source_image_string, $source_image_info['width'], $source_image_info['height'], $thumbnail_image_size['width'], $thumbnail_image_size['height']);
if (empty($thumbnail_image['data']) || $thumbnail_image['length'] <= 0) die('Error');

3.5、图片水印定义

$watermark_image_file = 'path/to/watermark.png';
$watermark_image_width = 900;
$watermark_image_height = 600;
$watermark_image_size = fix_image_size($source_image_info['width'], $source_image_info['height'], $watermark_image_width, $watermark_image_height);

3.6、处理水印前缩放处理

$watermark_resize_image = resize_image($source_image_string, $source_image_info['width'], $source_image_info['height'], $watermark_image_size['width'], $watermark_image_size['height']);
if (empty($watermark_resize_image['data']) || $watermark_resize_image['length'] <= 0) die('Error');

3.7、水印处理

$watermark_image = watermark_image(base64_encode($watermark_resize_image['data']), $watermark_image_size['width'], $watermark_image_size['height'], $watermark_image_file);
if (empty($watermark_image['data']) || $watermark_image['length'] <= 0) die('Error');

4、返回值

4.1、图片类型

$attach_type

4.2、原图

4.2.1、原图二进制数据

$original_image_content

4.2.2、原图大小

$attach_size

4.3、缩略图

4.3.1、缩略图二进制数据

addslashes($thumbnail_image['data'])

4.3.2、缩略图大小

$thumbnail_image['length']

4.4、水印图

4.4.1、水印图二进制数据

addslashes($watermark_image['data'])

4.4.2、水印图大小

$watermark_image['length']

5、入库 SQL 构造

略。

- EOF -
本博自 2012 年光荣地被 GFW 认证后,长期流亡海外。辗转香港、日本、美国等地,依然在高墙之外。2014 年的时候,眼看我的域名邮箱都收不到来自墙内的邮件,再也坐不住了。后来通过一些技术方式调整了部署,邮箱恢复正常,本博也终于得见天日。

三年多的时间发生了什么?我不能告诉你。只能说我也做了很多事情,唯一值得庆幸的是,我终于离开了互联网行业。这种感觉也正如同围城效应,现在反思前后,居然还有些许不舍。再值得庆幸的是,互联网就在我们身边。你玩儿,或者不玩儿,Ta 都在这里。每时每刻、不离不弃。

最近又遇到一件事情让我重操旧业。作为重度 Google 用户,已经具备常年与 GFW 作斗争的经验。然而在各种两会各种峰会的轮番轰炸下,梯子一个一个倒下去。SSH 转 Socks5 的方式早已落伍,各种 VPN 服务也在挣扎。为了能够更愉快地玩耍,我决定自食其力。

首先要有一台墙外的服务器或者 VPS。现在阿里云、腾讯云等各种云都做得不错,价格也亲民(我用的不是上述服务商,别问为什么,谢谢)。操作系统 CentOS,开始:

检查内核环境是否包含 mppe,是否支持 pptp。CentOS 6.4 内核版本在 2.6.15 以上,都已默认集成。

cat /dev/ppp
cat /dev/net/tun

安装 ppp、防火墙与 pptpd:

yum install -y ppp iptables
wget -c http://poptop.sourceforge.net/yum/stable/packages/pptpd-1.4.0-1.el6.x86_64.rpm
rpm -Uhv pptpd-1.4.0-1.el6.x86_64.rpm
yum install pptpd

修改配置文件中的 DNS 为 8.8.8.8 和 8.8.4.4:

vi /etc/ppp/options.pptpd

配置 VPN 账户:

vi /etc/ppp/chap-secrets

配置客户端分配到内网的 IP 地址,记得在最后加一个空行。

vi /etc/pptpd.conf

修改 net.ipv4.ip_forward 为 1:

vi /etc/sysctl.conf

生效配置,启动防火墙服务:

/sbin/sysctl -p
/sbin/service iptables start

根据网卡参数配置防火墙。由于我的 VPS 有两个公网 IP,就这样:
/sbin/iptables -t nat -A POSTROUTING -o eth1 -s 192.168.0.0/24 -j SNAT --to-source xx.xx.xx.xx
/sbin/iptables -t nat -A POSTROUTING -o eth1:1 -s 192.168.0.0/24 -j SNAT --to-source x.x.x.x

保存设置,重启服务:

/etc/init.d/iptables save
/sbin/service iptables restart

最后重启 pptpd 就大功告成了:

service pptpd restart

还可以设置开机启动:

chkconfig pptpd on
chkconfig iptables on

参考文章《centos6.4安装搭建pptp vpn服务(附pptp vpn 一键安装包) | 大步's Blog》,原文作者:大步。原链接已失效。

从今天开始,妈妈再也不用担心我的学习。家中小米路由以及单位极路由完美适配。其中极路由本身有智能路由模式,小米路由需要刷开发包,开启 SSH。具体可参见《正确姿势使用智能VPN分流,无缝国内外分流科学上网》。

- 阅读剩余部分 -

这次,我只想说:Fuck GFW!

中共执政的 63 年,是走有“中国特色”封建集权制道路的 63 年、愚国愚民的 63 年。你们千万不要得意忘形,以为自己有多伟大的政绩,又不辱毛爷爷的使命,把维稳工作做得滴水不漏。在我眼里,你们就是跳梁小丑。不要以为你们在全国范围内投放播出了一部长达几十年的电视连续剧《新闻联播》,就真的可以遮天蔽日、为所欲为,就真的以为老百姓会相信你们在戏里表演的那样:领导都很忙,鞠躬尽瘁死而后已、社会主义中国日益繁荣富强、资本主义人民却生活在水深火热之中。不要把全体人民都当作傻瓜,你们的拙劣演技我们是有目共睹的。

我不得不承认,你们以前是土匪军,现在是执政党,煽颠的能力还是不错的。这从最近钓鱼小岛这场戏就可以看出,也许你们有时候真的可以用你们的喉舌控制媒体的声音、忽悠一些不明真相的群众、转移公众的视线。但是纸永远包不住火,连小柯南都知道,真相只有一个。

远的就不说了。除此之外,你们还禁锢进步思想,大搞互联网审查制度、干涉网民正常上网,居然大言不惭地说中国的互联网是最开放的。能将掩耳盗铃发挥到此般极致,我深深地佩服你们的勇气。你们可以不要脸、可以自甘堕落,但是逆潮流而动、违背社会发展的客观规律、抵制基本普世价值、无视人权,你们就一定能成为民族的千古罪人。加油,让我们拭目以待。

回到文章主题,说说本博是如何一步一步取得“被认证”的荣誉的。

一开始本博还在天朝生根发芽,突然全国范围推行备案政策,我就开始着手搬家。后来天朝的相关政策一直不见正常,甚至出现了“白名单”传闻,于是我在 Godaddy 买了主机和固定 IP,确定永久“移民”了。

随后一段时间,国内访问本博除了速度慢之外其他也都正常。但是好景不长,Google 事件发生后,Google 中国域名迁至香港。那时我发现国内访问国外的网站开始时断时续了,后来甚至有人总结出天朝当局封锁基于 HTTPS 协议的 Google 服务的时间段规律。

接着我发现 Godaddy 的 DNS 在国内也开始不正常,本博的访问也出现了类似于这种规律的周期性抽风。于是我又申请了 SSL 证书,并启用强制性 HTTPS 跳转,稍有成效。

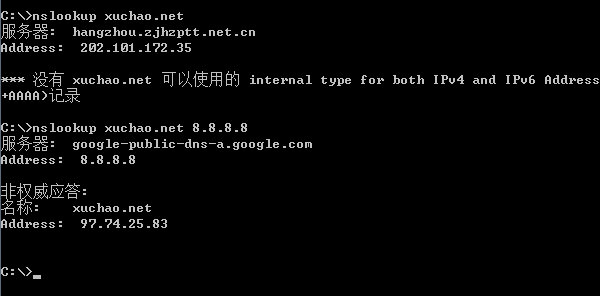
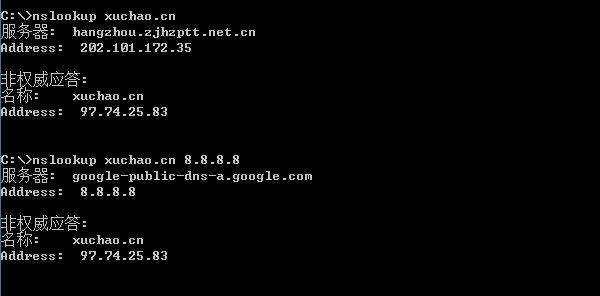
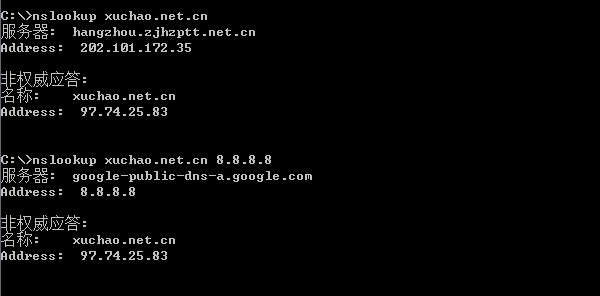
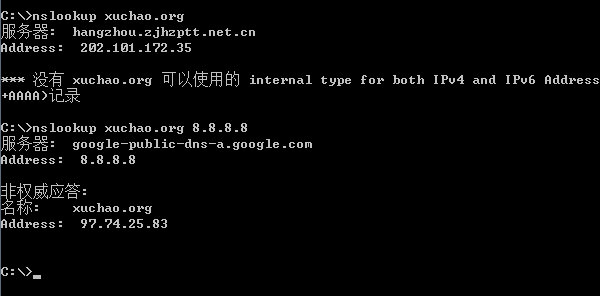
今年国庆节期间,监控报告显示本博在全国大部分地区开始全时段的无法访问。我的小心脏紧张了一下,并意识到这次是来真的了。果然,经过技术测试已证实本博 xuchao.org 与 xuchao.net 在全国大部分地区 ISP 的 DNS 中被屏蔽解析,feed 订阅地址 feed.xuchao.org 也随之只能翻墙打开,导致使用诸如 Google Reader 等订阅器的同学以为我很久没更新博客了。其中 xuchao.org 尤为悲惨,连 MX 记录也不给我放过,直接导致我现在接收或者发送国内运营商的邮件,会有很长很长时间的延迟甚至退信。相对于这两个域名,xuchao.cn 等几个国内域名和中文域名幸免于难。

突然想起前几天这位同学的评论,应该也与这事有关系。

放图说明:

在整个测试过程中,我要感谢 blankyao水总明城、郭丹、磁力等同学先后给予无私的协助与关怀。

解决方案:

既然是 DNS 屏蔽,我们可以通过 8.8.8.8 或者本地 hosts 文件的方式来解决。如果您不知道我在说什么,请到 CCAV 等娱乐频道自学。谢谢。

最后,feed 的问题我将在近期解决,初步计划迁移到 feedburner。敬请期待。